Thesis’ is a word that is familiar to anyone who has studied at a high school. A thesis is a scientific essay that students must write as part of the final requirements for academic education.
Thesis writing has certain rules. One of those rules is page numbers. There are pages that must be numbered in Roman and some that must be numbered. These rules must be adhered to when writing a thesis.
The difference in numbering on thesis pages is sometimes quite confusing. Even though in Microsoft Word (Ms. Word) different page numbering can be done automatically, there are still students who don’t know how.
Instead of creating page numbering automatically in Microsoft Word, students who don’t know how do it manually. Creating page numbers manually can make page numbers messy or untidy. Therefore, students must know how to create page numbers automatically.
Are you a student who is having difficulty creating different page numbering in your thesis? If yes, read this article carefully, because we will explain it in detail!
How to Make Page Numbers in Microsoft Word
Before knowing how to create different pages in Microsoft Word, let’s first learn the basic ways to create pages as follows:
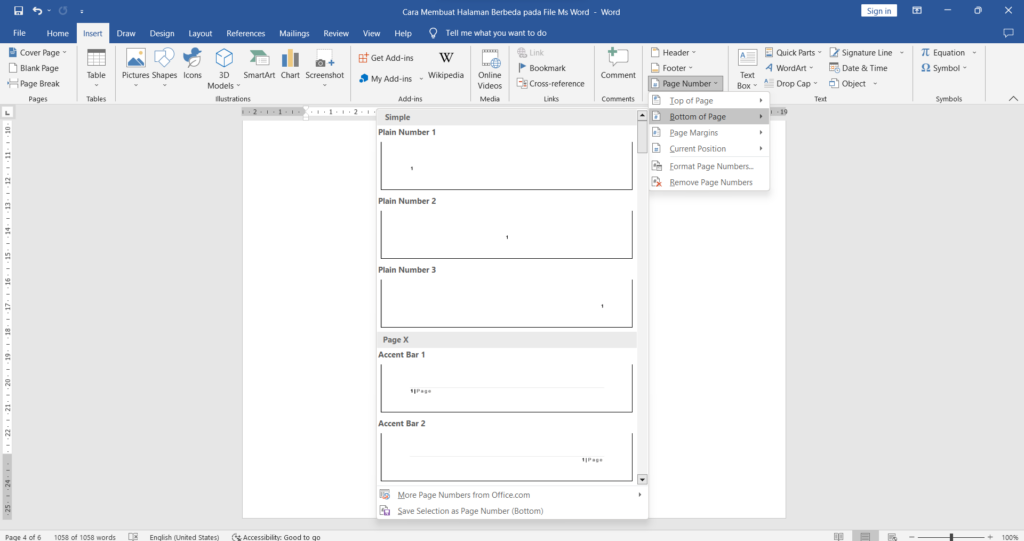
1. Click Insert
Prepare the document you want to number the pages for. Then, move the cursor to the menu bar. Next, click ‘Insert.’ You will see the ‘Page Number’ menu next to ‘Header’ and ‘Footer.’
2. Click Page Number
Click ‘Page Number’ and select the position of the page number that you want or that is in accordance with the rules for writing a document/thesis.
3. Select Position
At Microsoft. Word, there are several page number position options, namely Top of Page, Bottom of Page, Page Margins, and Current Position.
4. Click the desired position
After determining the position of the page number, click on that position. After that, the page number will appear automatically.
5. Page Number Format
At Microsoft. Word, if you don’t set the page number format, then what will be displayed will be numbers (1, 2, 3, etc.). Therefore, if you want to change the number format to Roman, when selecting ‘Page Number,’ before clicking on the position, click ‘Format Page Numbers’ first.
How to Make Different Page Numbers in Microsoft Word
After understanding the basic way to create a page in Microsoft. Word, now you can learn how to create different page numbers. Pay attention carefully, OK?
1. Select Page
Open the Microsoft Word document whose page numbers you want to set. Then, select the page that will be numbered in a different format.
2. Select Position
Click ‘Insert’ and ‘Page Number.’ Then, select the page number position you want, between Top of Page, Bottom of Page, Page Margins, and Current Position.
3. Select Format
On the ‘Page Number’ menu, click ‘Format Page Numbers’ and select the page number format according to the document rules. Then, enter the numbers in the ‘Start at’ column and click ‘OK.’
4. Click Page Break
After selecting the format, the page numbers will appear automatically. Place the cursor between the pages whose page numbers you want to differentiate. Then, select the ‘Layout’ menu and click ‘Page Break.’
5. Click Next Page
Click ‘Next Page’ and click the page number twice. Then, create a different page number format by clicking ‘Format Page Numbers’ as in the previous step. So, you have successfully created different page numbers in one Microsoft document. Word.
How to Make Different Page Numbers with Numbers and Roman
As previously explained, certain documents such as theses require a combination of numerals and Roman numbering. Here’s how to make different page numbers using numerals and Roman.
1. Open Documents
Open the document you want to edit in Microsoft. Word. Move the cursor to the bottom of the first page or cover page of the document.
2. Select Menu Bar
Click the ‘Layout’ menu and select the ‘Breaks’ option. Then, click the ‘Next Page’ menu.
3. Enter the Header & Footer Menu
Double click on the ‘Header’ or ‘Footer’ on the page. Then, the ‘Header & Footer’ menu will appear. Click ‘Link to Previous’ in the ‘Navigation’ sub menu.
4. Select Position
Klik ‘Insert’ dan ‘Page Number.’ Lalu, pilih posisi nomor halaman yang kamu mau, antara Top of Page, Bottom of Page, Page Margins, dan Current Position.
5. Select Format
Click ‘Format Page Number’ and select Roman numerals. Then, click ‘Start at (i),’ then all pages will have Roman numbers.
6. Select Menu Layout
To add a number format to the page number, you have to start with the first steps. Move the cursor to the start of the page. Select the ‘Layout’ menu, then click ‘Breaks’ and ‘Next Page.’
7. Enter the Header & Footer Menu
Double-click at the top or bottom of the page to bring up the ‘Header & Footer’ menu. Select ‘Page Number’ and ‘Format Number,’ then select a number. Set the first page in the ‘Start at’ menu. Click ‘OK,’ then the document you have now has page numbers in the form of numerals and Roman.
Page Number Position Options
The following is an explanation of each page number position option in Microsoft.Word.
1. Top Of Page : The page number is at the top of the document.
2. Bottom Of Page : The page number is at the bottom of the document
3. Page Margin : The position of the page number is in the left margin
4. Current Possion : The position of the page numbers is according to the author’s wishes
So, that’s the explanation of how to create different page numbers in a document in Microsoft Word. Microsoft Word must not only be mastered by students, but also students and workers. This is because this software is used in schools and offices.